netbird安装使用
对我来说netbird比headscale好处就是可以分组自定义peer路由,完全实现服务端控制下发路由,且下发和回收路由速度几乎秒级(headscale关闭路由后很长时间不清理路由)
安装
使用oth0方式
官方文档: https://docs.netbird.io/selfhosted/selfhosted-guide#advanced-guid
参照文档服务器放行端口
准备一个域名 netbird.example.com
clone release 代码
1
2
git clone https://github.com/netbirdio/netbird.git
cd netbird/infrastructure_files/已Auth0作为认证
创建NetBird Login应用
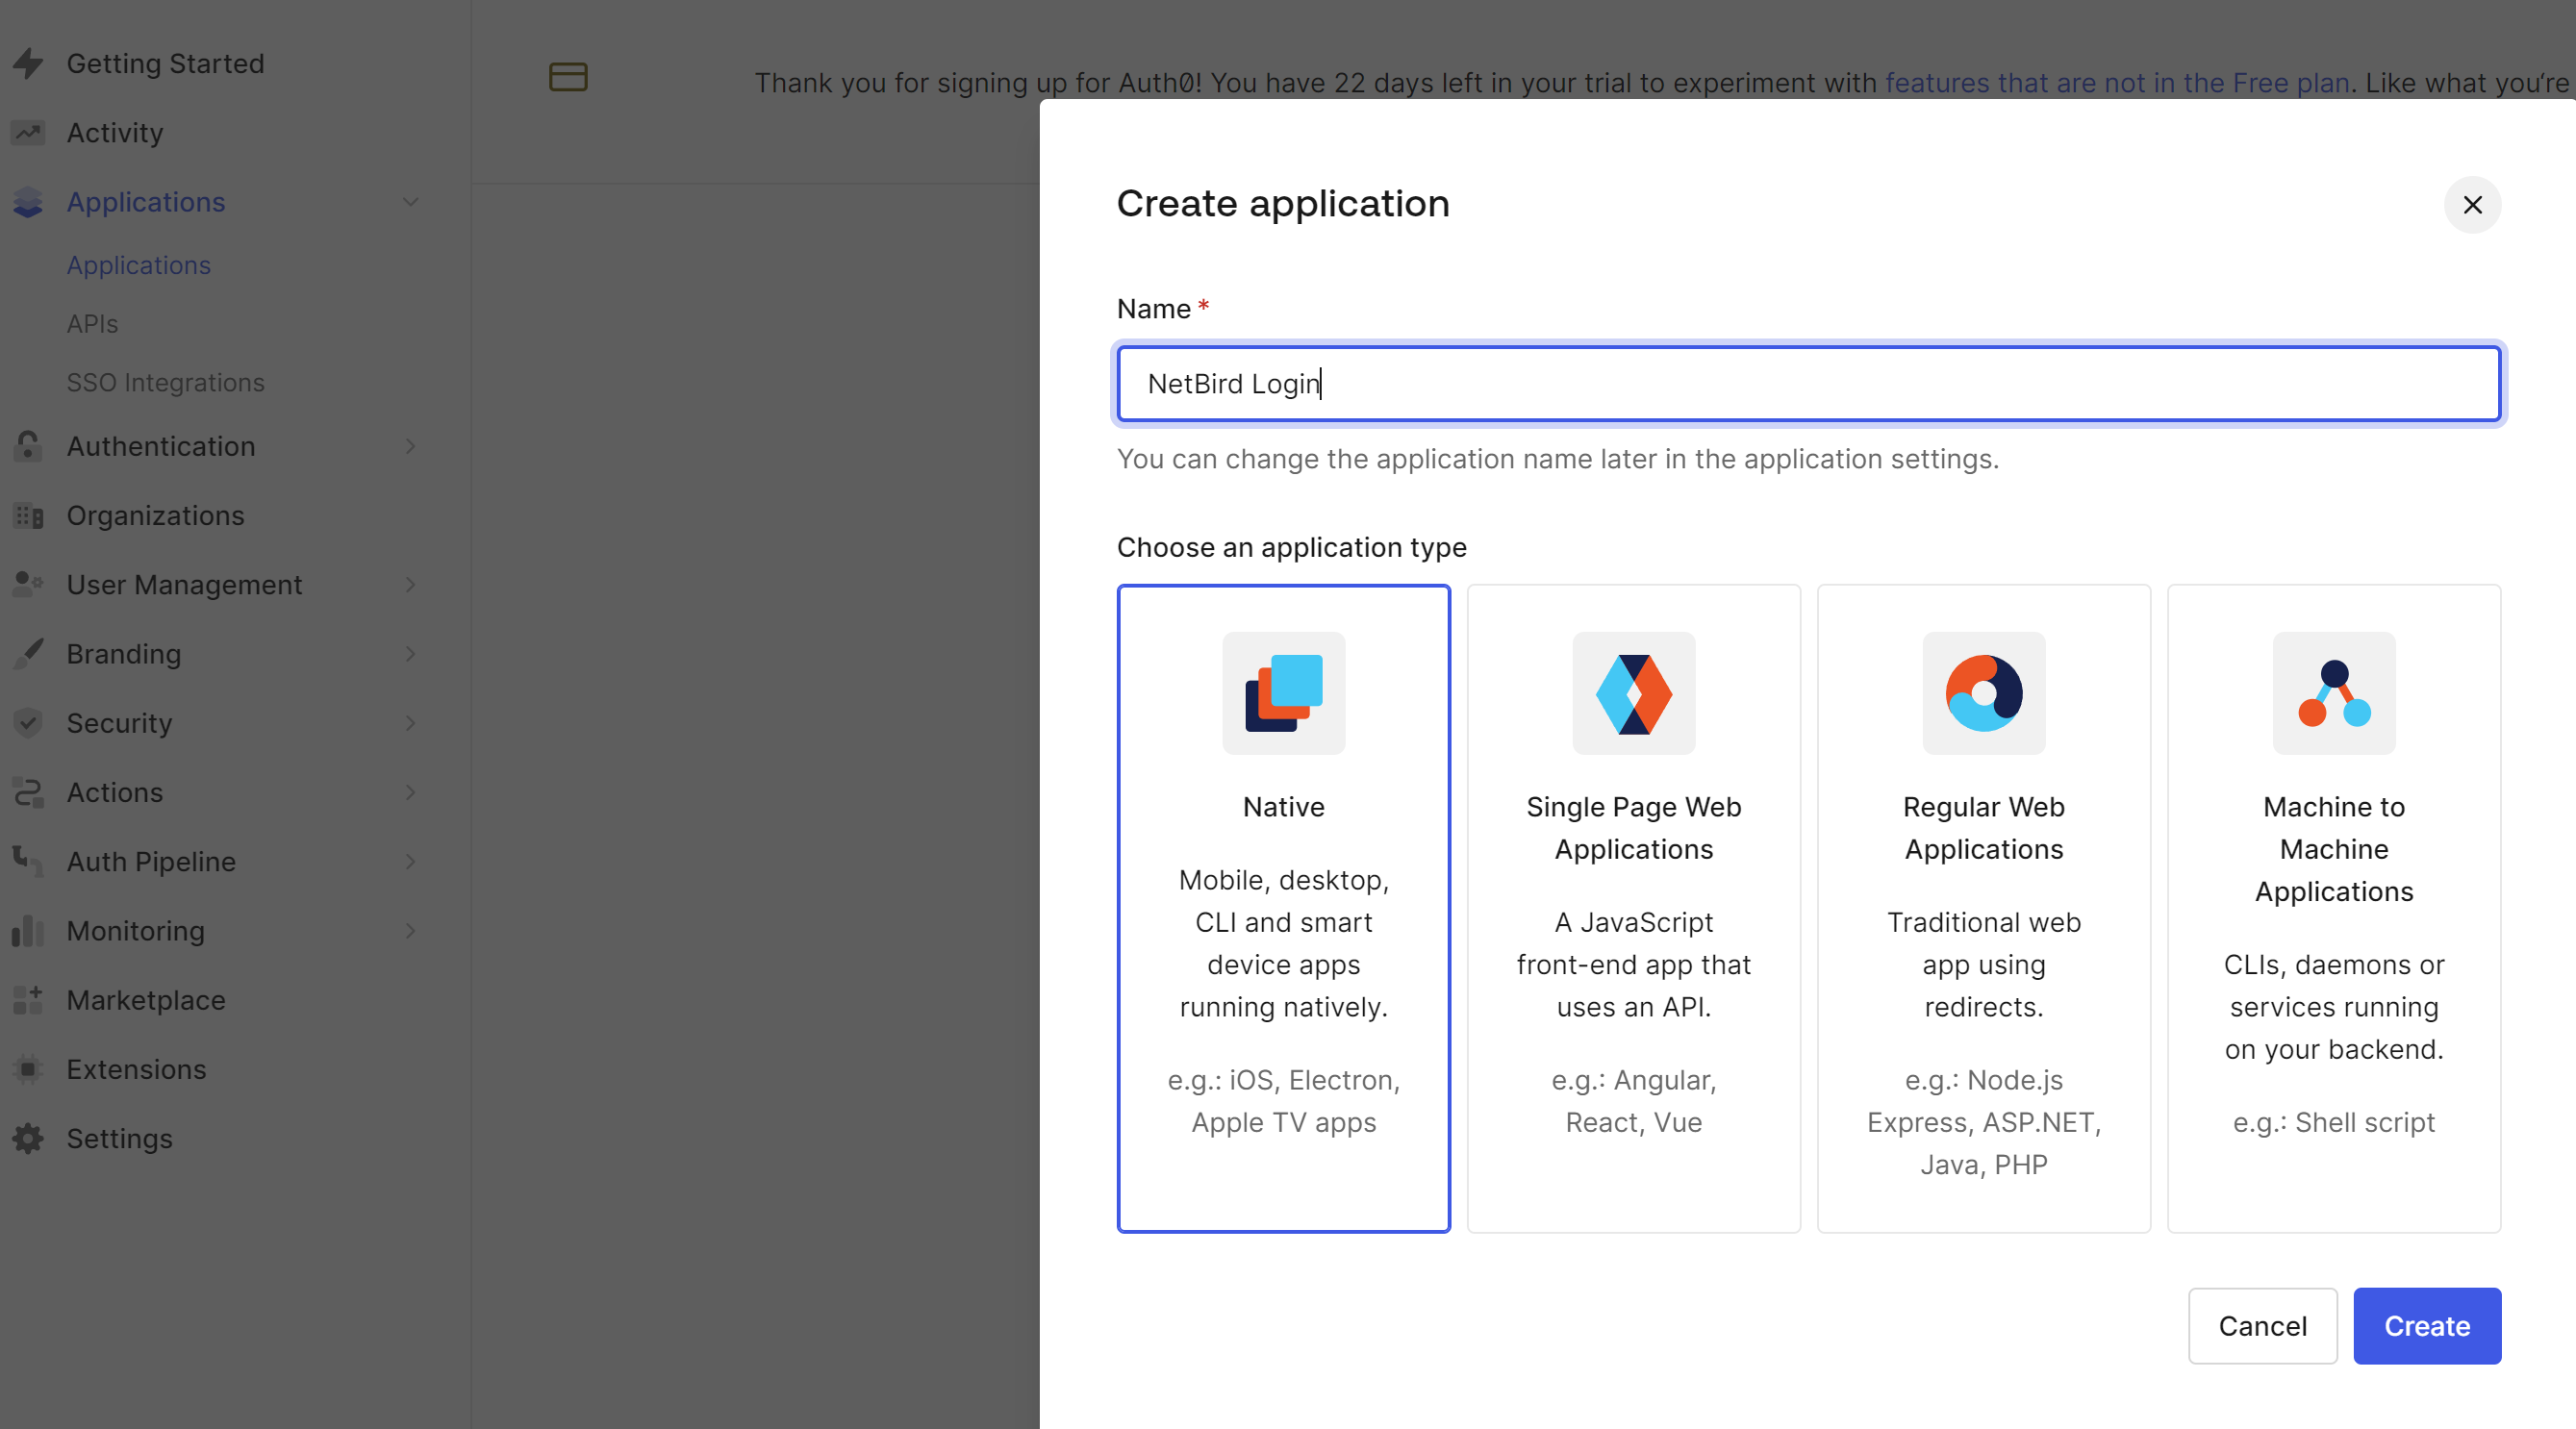
Application Login URI 填入 https://netbird.example.com
Allowed Callback URIs、Allowed Logout URLs 与 Allowed Web Origins 都填入 https://netbird.example.com,http://netbird.example.com
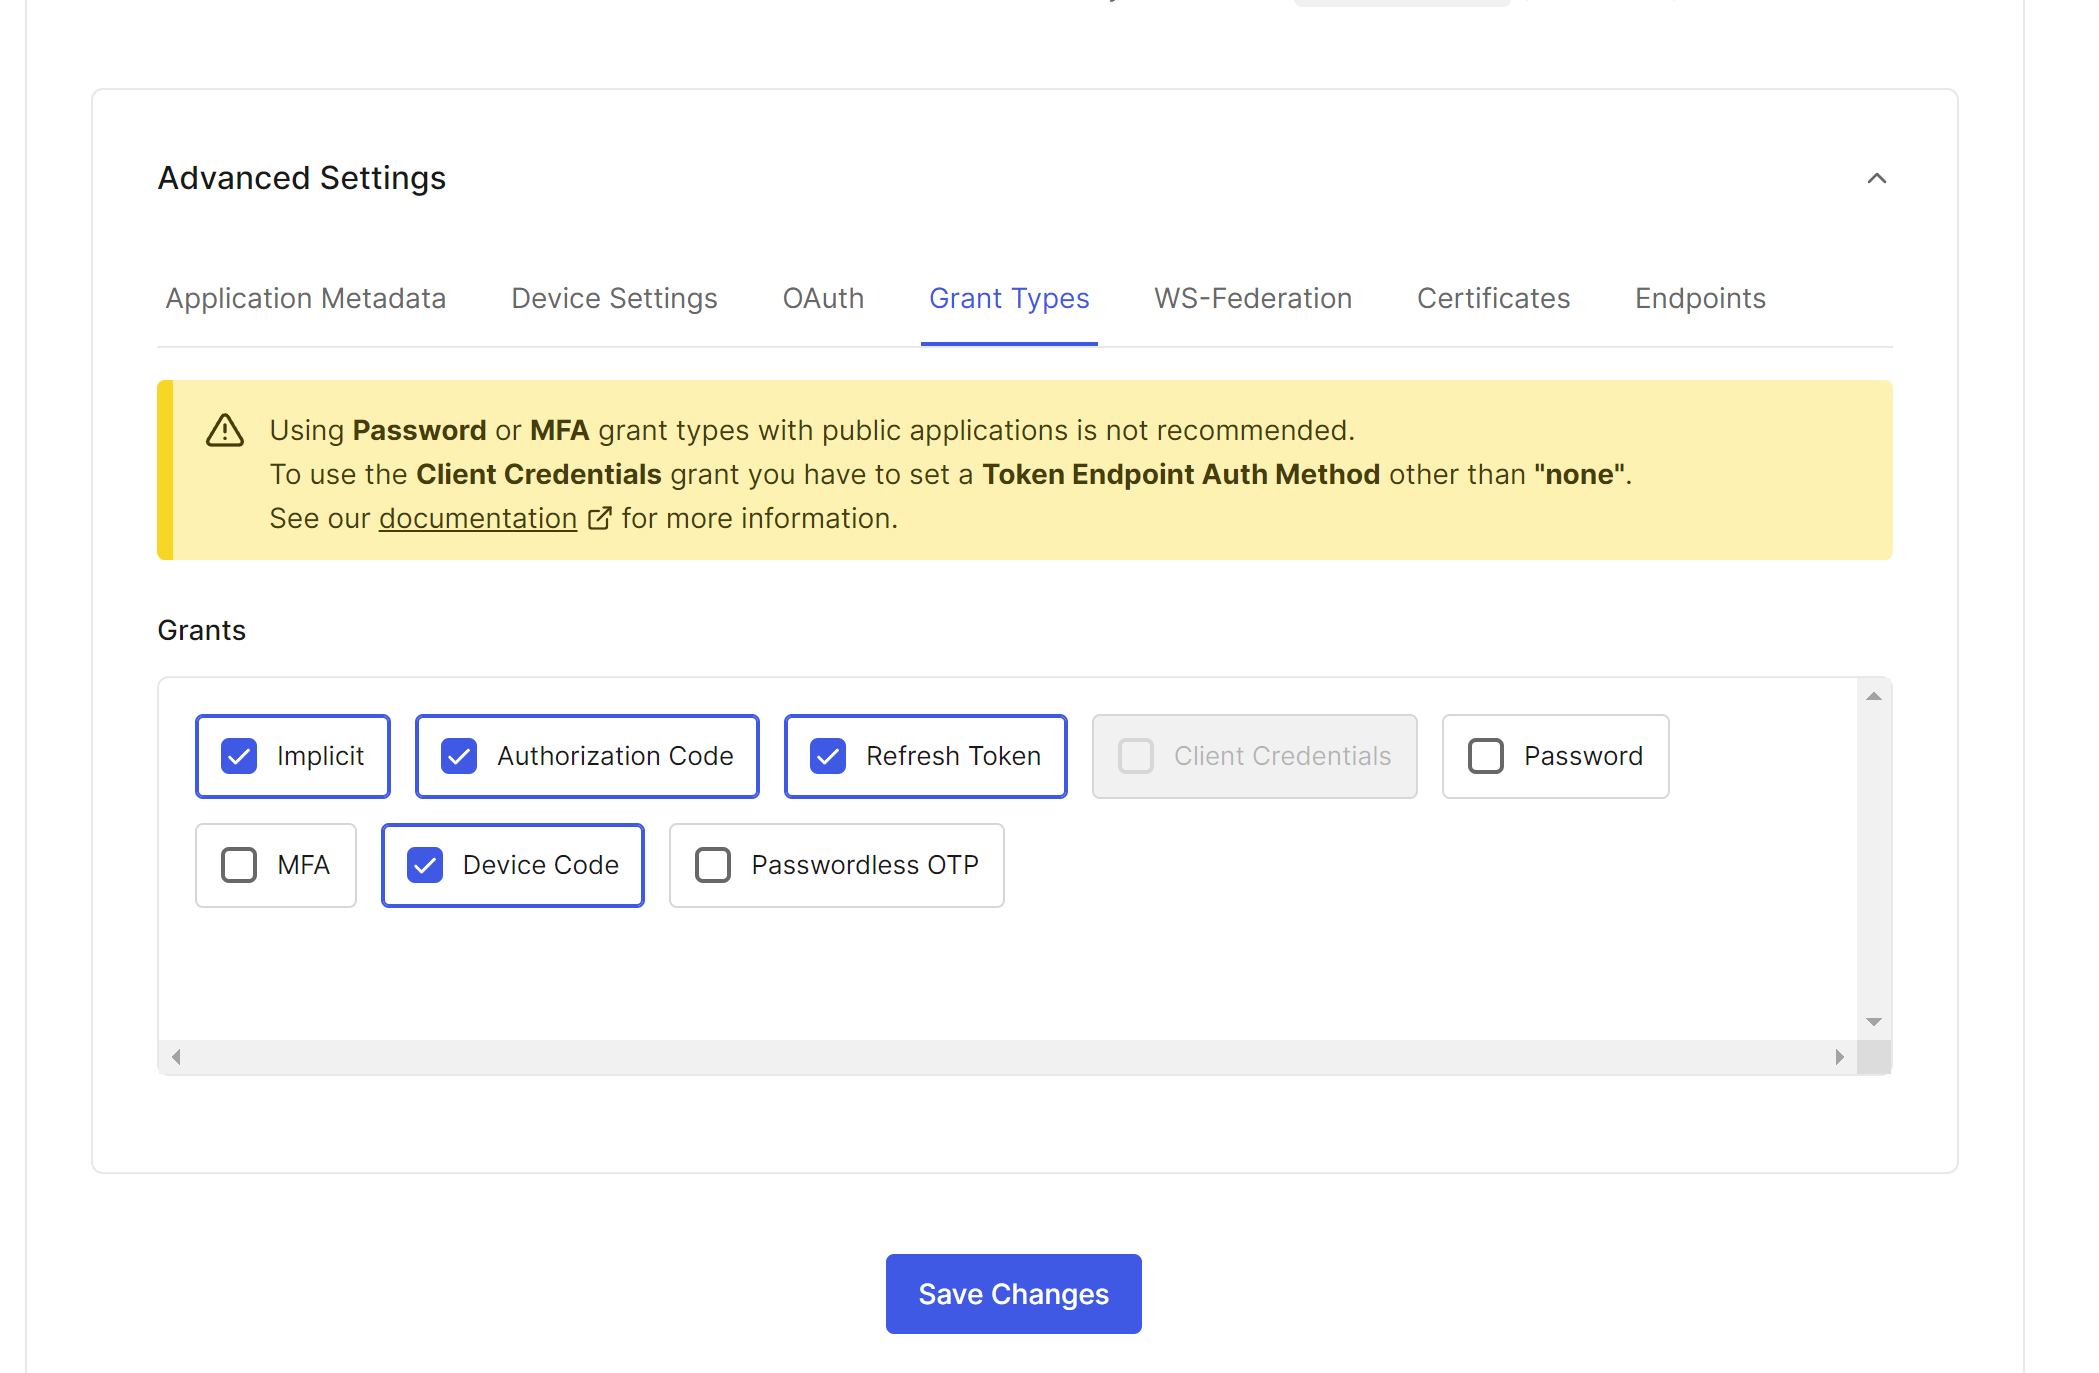
启用Device Code授权方式:
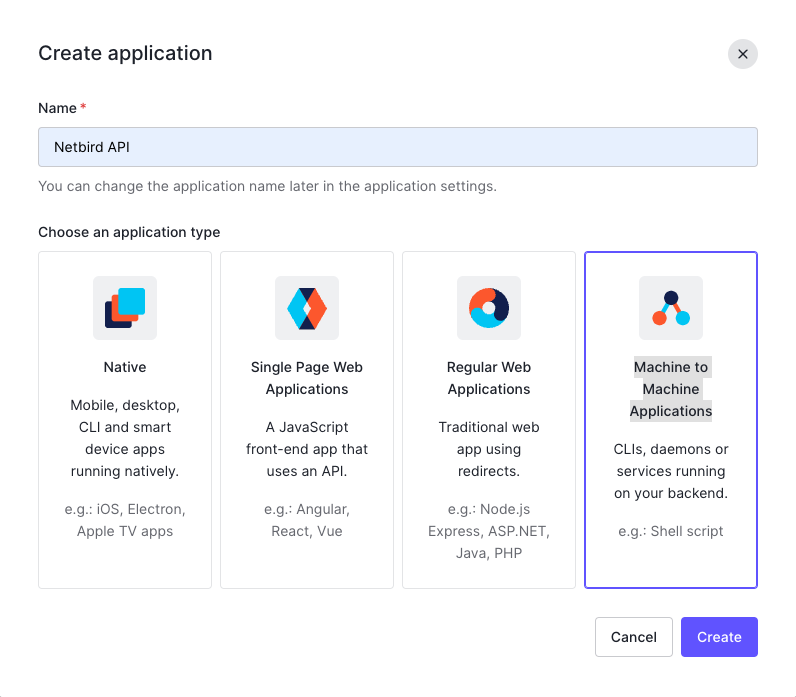
创建和配置机器对机器应用程序。
此应用程序将用于授权对Auth0 Management API的访问。
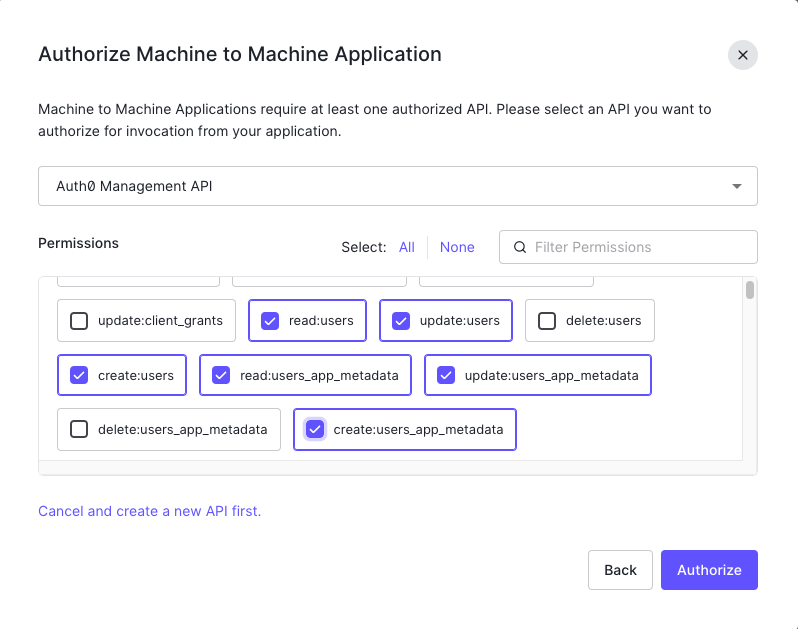
勾选权限
配置:
- Copy
Client IDtoNETBIRD_IDP_MGMT_CLIENT_IDin thesetup.envfile - Copy
Client SECRETtoNETBIRD_IDP_MGMT_CLIENT_SECRETin thesetup.envfile - Copy
DOMAINtoNETBIRD_IDP_MGMT_EXTRA_AUDIENCEin thesetup.envfile
- Copy
创建和配置Auth0 API
此Auth0 API将用于访问NetBird管理服务API。
https://auth0.com/docs/quickstart/backend/golang#create-an-api
1
2
3
4
5
6
7
8
9
10
11
12
13
14
15
16
17
18
19
20
21
22
23
24
25
26
27
28
29
30
31
32
33
34
35
36
37
38
39
40
41
42
43
44
45
46
47
48
49
50
51
52
53
54
55
56
57
58
59
60
61
62
63
64
65
66
67
68
69
70
# example file, you can copy this file to setup.env and update its values
#
Dashboard domain. e.g. app.mydomain.com
NETBIRD_DOMAIN="sit-wg.suosihulian.cn"
-------------------------------------------
OIDC
e.g., https://example.eu.auth0.com/.well-known/openid-configuration
-------------------------------------------
<DOMAIN> 为 auth0应用中Domain
NETBIRD_AUTH_OIDC_CONFIGURATION_ENDPOINT="https://<DOMAIN>/.well-known/openid-configuration"
NETBIRD_AUTH_AUDIENCE="https://quickstarts/api" # 是创建的 auth0 APIs Identifier值
e.g. netbird-client
NETBIRD_AUTH_CLIENT_ID="xxxx" # NetBird Login CLIENT ID
indicates the scopes that will be requested to the IDP
NETBIRD_AUTH_SUPPORTED_SCOPES="openid profile email offline_access api email_verified"
NETBIRD_AUTH_CLIENT_SECRET is required only by Google workspace.
NETBIRD_AUTH_CLIENT_SECRET=""
if you want to use a custom claim for the user ID instead of 'sub', set it here
NETBIRD_AUTH_USER_ID_CLAIM=""
indicates whether to use Auth0 or not: true or false
NETBIRD_USE_AUTH0="true" # 修改
if your IDP provider doesn't support fragmented URIs, configure custom
redirect and silent redirect URIs, these will be concatenated into your NETBIRD_DOMAIN domain.
NETBIRD_AUTH_REDIRECT_URI="/peers"
NETBIRD_AUTH_SILENT_REDIRECT_URI="/add-peers"
Updates the preference to use id tokens instead of access token on dashboard
Okta and Gitlab IDPs can benefit from this
NETBIRD_TOKEN_SOURCE="idToken"
-------------------------------------------
OIDC Device Authorization Flow
-------------------------------------------
NETBIRD_AUTH_DEVICE_AUTH_PROVIDER="none"
NETBIRD_AUTH_DEVICE_AUTH_CLIENT_ID="xxxx" # NetBird Login CLIENT ID
Some IDPs requires different audience, scopes and to use id token for device authorization flow
you can customize here:
NETBIRD_AUTH_DEVICE_AUTH_AUDIENCE=$NETBIRD_AUTH_AUDIENCE
NETBIRD_AUTH_DEVICE_AUTH_SCOPE="openid"
NETBIRD_AUTH_DEVICE_AUTH_USE_ID_TOKEN=false
-------------------------------------------
OIDC PKCE Authorization Flow
-------------------------------------------
Comma separated port numbers. if already in use, PKCE flow will choose an available port from the list as an alternative
eg. 53000,54000
NETBIRD_AUTH_PKCE_REDIRECT_URL_PORTS="53000"
-------------------------------------------
IDP Management
-------------------------------------------
eg. zitadel, auth0, azure, keycloak
NETBIRD_MGMT_IDP="auth0" # 修改为auth0
Some IDPs requires different client id and client secret for management api
NETBIRD_IDP_MGMT_CLIENT_ID="xxxx" # Netbird API
NETBIRD_IDP_MGMT_CLIENT_SECRET="xxxx" # Netbird API
NETBIRD_IDP_MGMT_EXTRA_AUDIENCE="https://xxxx.jp.auth0.com/api/v2/" # auth0 applications/APIs 页面中
NETBIRD_IDP_MGMT_EXTRA_ variables. See https://docs.netbird.io/selfhosted/identity-providers for more information about your IDP of choice.
-------------------------------------------
Letsencrypt
-------------------------------------------
Disable letsencrypt
if disabled, cannot use HTTPS anymore and requires setting up a reverse-proxy to do it instead
NETBIRD_DISABLE_LETSENCRYPT=false
e.g. hello@mydomain.com
NETBIRD_LETSENCRYPT_EMAIL="" # 记得改
-------------------------------------------
Extra settings
-------------------------------------------
Disable anonymous metrics collection, see more information at https://netbird.io/docs/FAQ/metrics-collection
NETBIRD_DISABLE_ANONYMOUS_METRICS=true # 修改
DNS DOMAIN configures the domain name used for peer resolution. By default it is netbird.selfhosted
NETBIRD_MGMT_DNS_DOMAIN=netbird.selfhosted执行初始化
1
2
3
4
5
6
7
8
需要先安装docker docker-compose
./configure.sh
docker-compose up -d
看日志,不报错就行
docker-compose logs signal
docker-compose logs management
docker-compose logs coturn
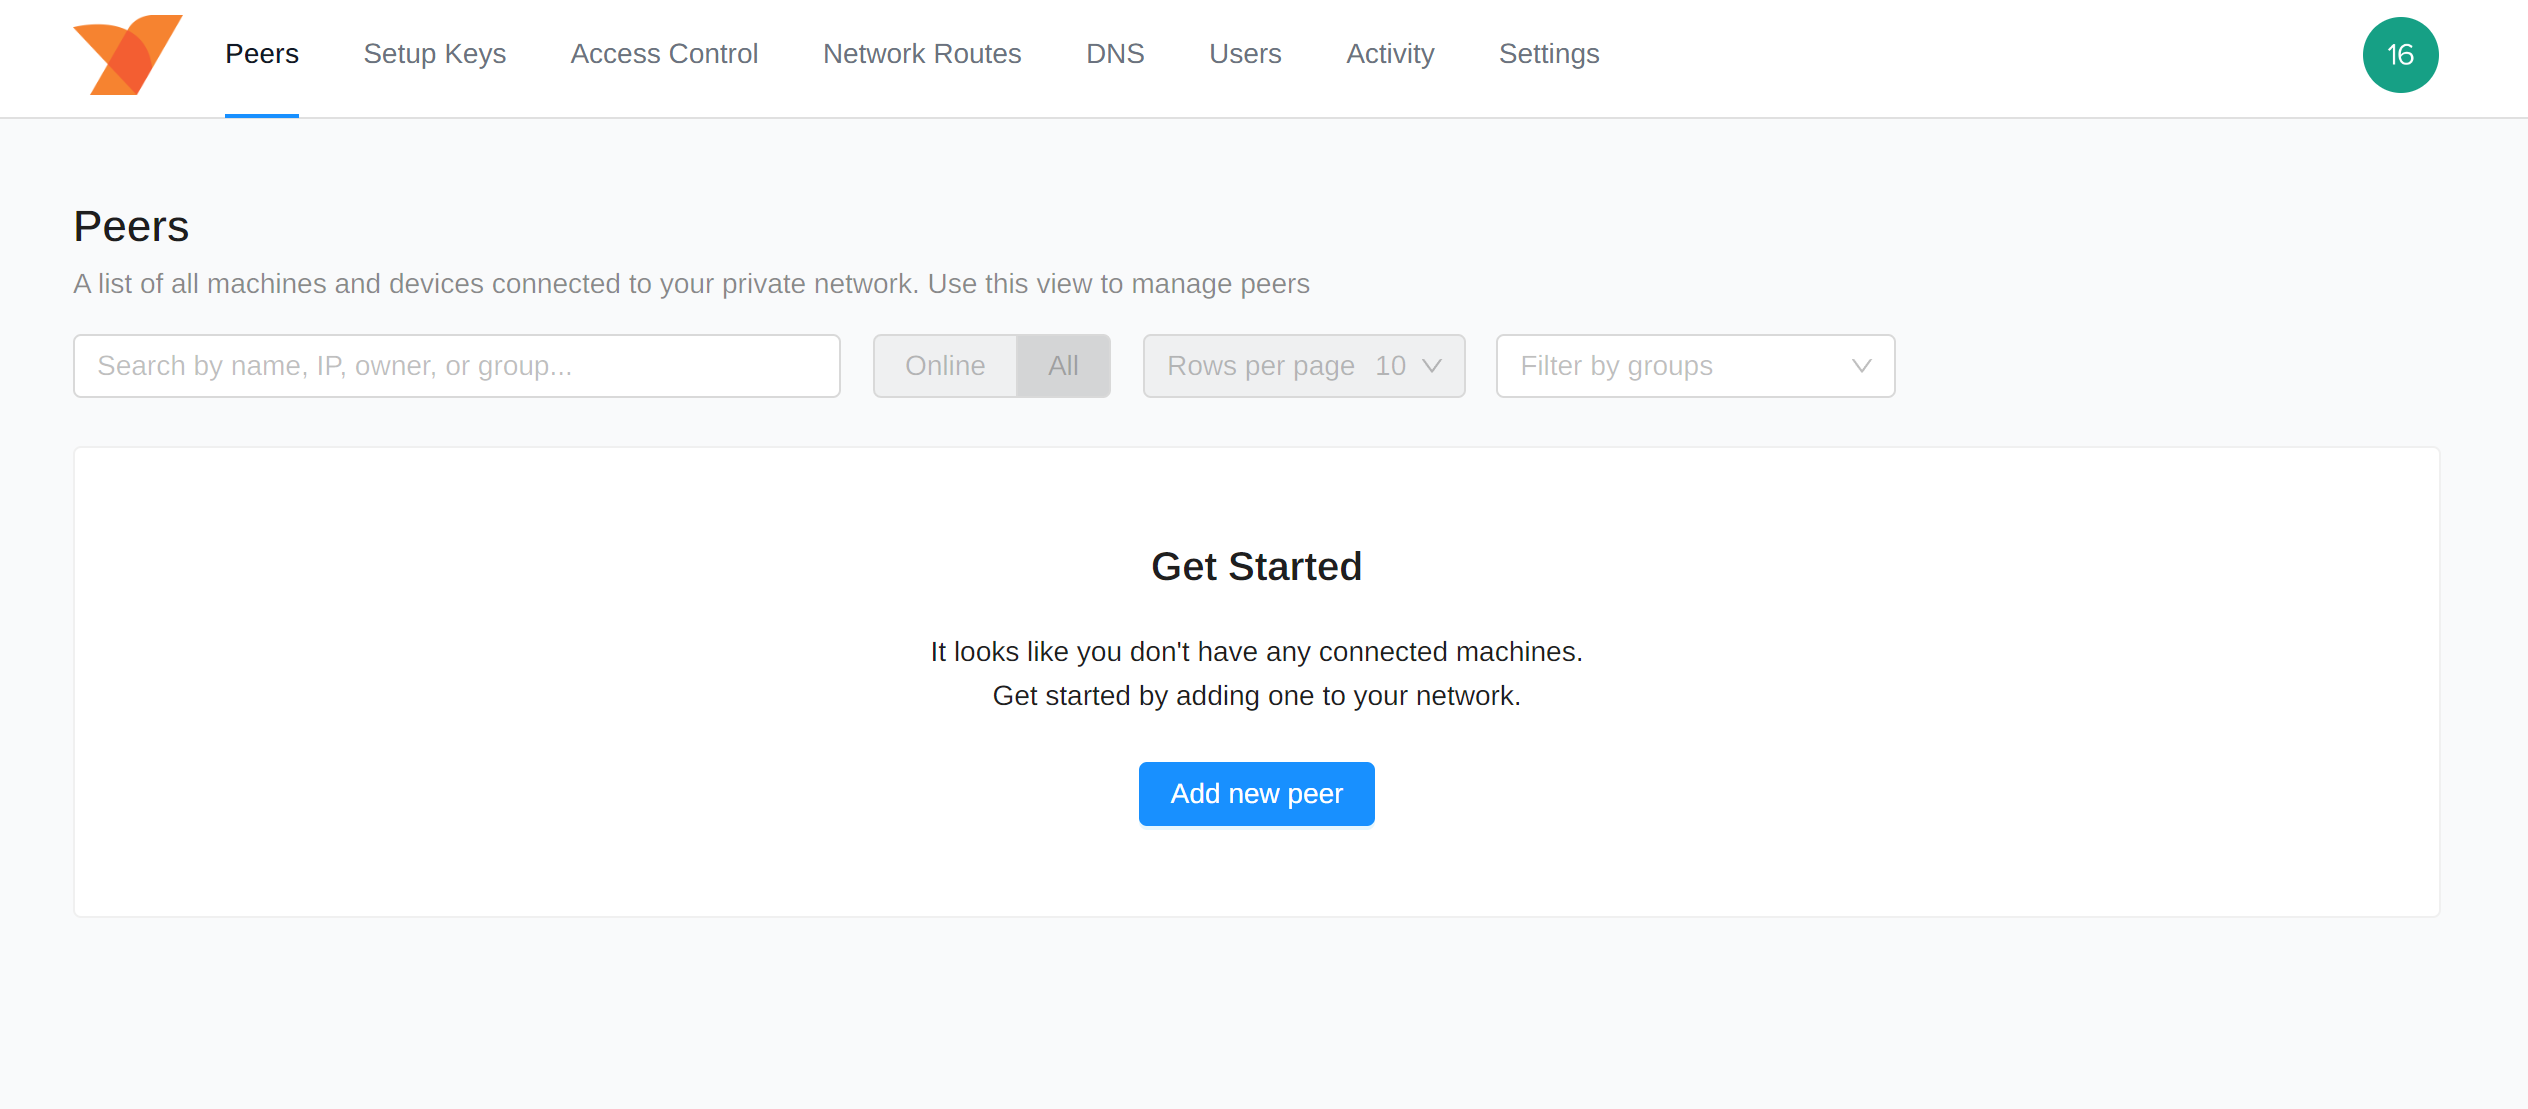
docker-compose logs dashboard访问域名后注册用户
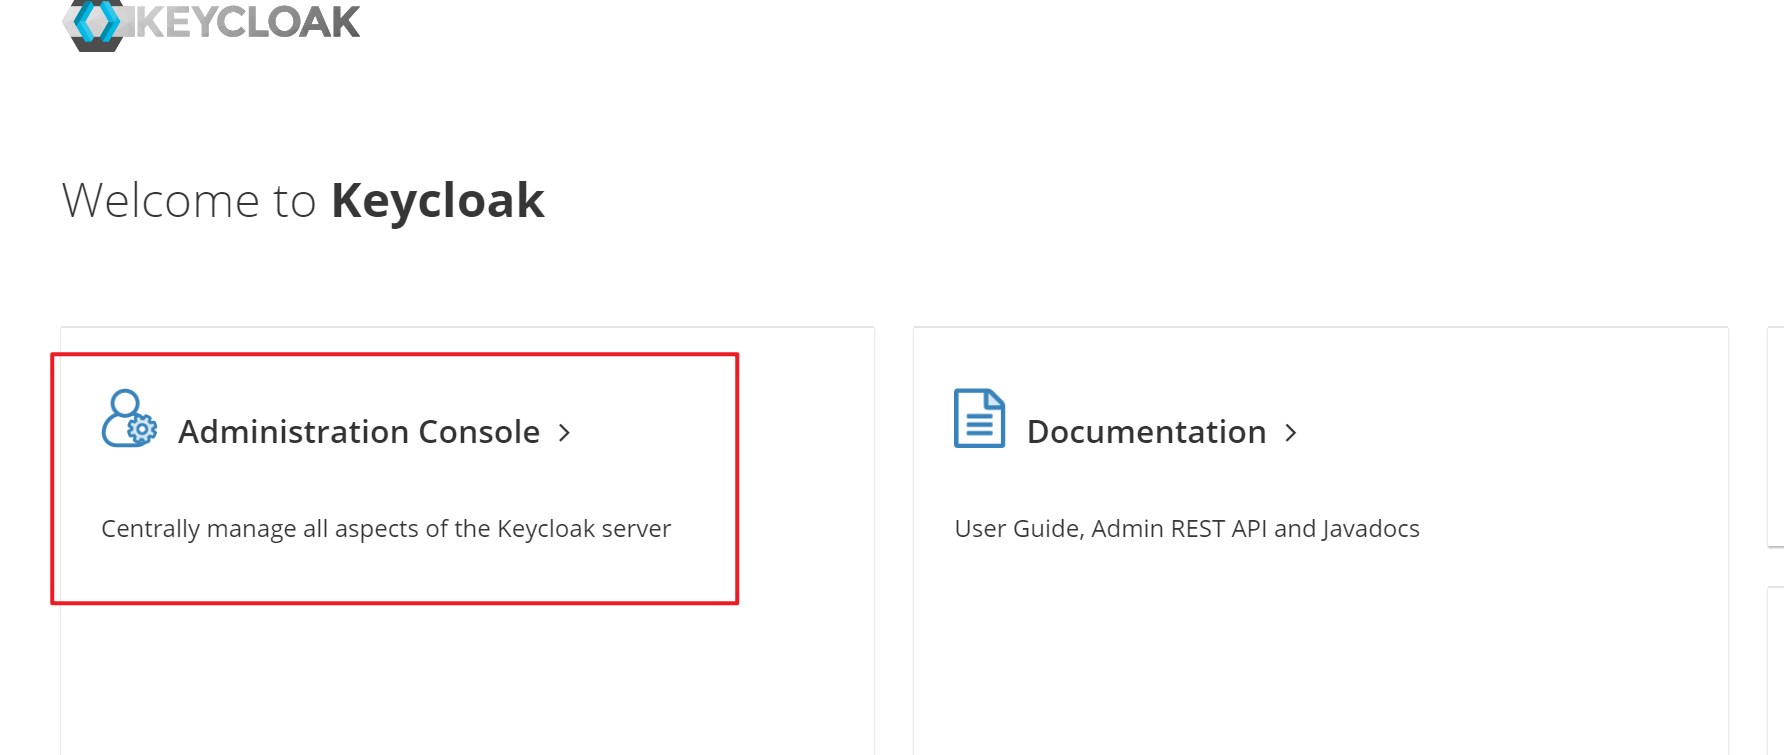
使用自建OIDC(keycloak)
部署keycloak
1 | apiVersion: networking.k8s.io/v1 |
参照官方文档:https://docs.netbird.io/selfhosted/identity-providers#keycloak
流程结束后访问https://< YOUR_KEYCLOAK_HOST_AND_PORT >/realms/netbird/.well-known/openid-configuration 有数据就ok
重新部署时记得把docker的所有卷及数据清理干净
1
2
3
docker ps -q | xargs docker rm -f
infrastructure_files_netbird-letsencrypt 保留
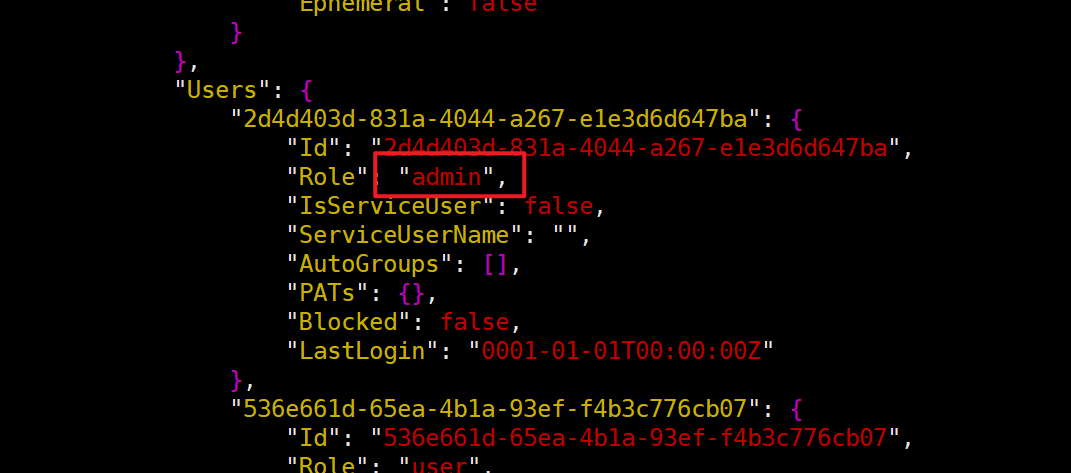
docker volume prune -af使用netbird残留数据搭建会产生权限异常问题,如果遇到权限问题,即页面能打开,但没有管理界面
将Role 修改 为 admin
使用
修改默认的IP地址池(默认的地址池会和阿里云内网的服务冲突,导致无法访问,比如使用aliyunlog下载日志)
1 | vim /var/lib/docker/volumes/infrastructure_files_netbird-mgmt/_data/store.json |
1 | import base64 |
在Setup Keys页面中创建key并复制
1 | netbird up --hostname xxx --management-url https://netbird.xxxx.cn:33073 --setup-key 8D1D79A2-462E-421C-B311-xxxxxxx |