Q's blog

一些个人文档笔记

k8s在生产中需要注意的各种事项和便捷方法

阅读全文 »
置顶

1
2
3
4
5
6
7
8
9
10
11
12
spring:
datasource:
hikari:
minimum-idle: 10
maximum-pool-size: 100
idle-timeout: 10000
max-lifetime: 30000
connection-timeout: 30000
login-timeout: 5
validation-timeout: 3000
connection-test-query: SELECT 1
validation-query: SELECT 1

validation-query

validation-query 是一个 SQL 查询语句,用于验证连接是否仍然有效。当连接从连接池中获取并且处于空闲状态时,Hikari 连接池会执行 validation-query 来确保连接仍然有效。如果执行 validation-query 失败或返回的结果不符合预期,连接将被标记为无效并从连接池中移除,然后将会尝试获取一个新的连接来替代。默认情况下,validation-query 被设置为 null,表示不进行连接的验证。

connection-test-query

connection-test-query 是一个可选的 SQL 查询语句,用于在连接被创建时进行测试。当连接池创建新的连接时,会在连接被返回之前执行 connection-test-query。如果执行 connection-test-query 失败或返回的结果不符合预期,连接将被标记为无效并丢弃,然后将会尝试获取一个新的连接来替代。默认情况下,connection-test-query 被设置为 null,表示不进行连接的测试。

总结起来,validation-query 在连接从连接池中获取时进行验证,而 connection-test-query 在连接被创建时进行测试。这两个属性的目的都是确保连接的有效性,并在需要时替换无效的连接。

validation-timeout 毫秒 默认5s

当连接从连接池中获取并且处于空闲状态时,连接池会执行 validation-query 来验证连接的有效性。validation-timeout 指定了执行验证查询的最大等待时间。如果在指定的超时时间内无法完成验证查询,连接将被标记为无效并从连接池中移除,然后将会尝试获取一个新的连接来替代。

Elasticsearch

https://www.elastic.co/cn/downloads/elasticsearch

1
2
3
4
5
6
7
8
9
10
11
12
13
14
使用非root用户
vim config/jvm.options
-Xms1g
-Xmx2g
vim config/elasticsearch.yml
xpack.security.http.ssl:
enabled: false # 关闭
keystore.path: certs/http.p12

# Enable encryption and mutual authentication between cluster nodes
xpack.security.transport.ssl:
enabled: false # 关闭

启动后看日志,密码在里面

Kibana

https://www.elastic.co/cn/downloads/kibana

1
2
3
4
5
6
7
使用非root用户
vim config/kibana.yml
server.host: "0.0.0.0"
elasticsearch.hosts: ["http://localhost:9200"]
elasticsearch.username: "test"
elasticsearch.password: "123456"
elasticsearch.ssl.verificationMode: none

Fluentd

1
2
3
4
5
6
7
# fluent-package 5 (LTS)
curl -fsSL https://toolbelt.treasuredata.com/sh/install-redhat-fluent-package5-lts.sh | sh

查看fluetd配置文件是否正确:fluentd --dry-run -c fluent.conf

systemctl start fluentd.service
# 修改 /usr/lib/systemd/system/fluentd.service 改为root运行

编辑配置文件

1
2
3
4
5
6
7
8
9
10
11
12
13
14
15
16
17
18
19
20
21
22
23
24
25
vim /etc/fluent/fluentd.conf
<source>
@type tail
format /^(?<all>.*)$/
path /var/log/nginx/access.log*
#pos_file /home/fluentd/nginx-access.pos
tag nginx.access
</source>


<match nginx.access>
@type elasticsearch
host 127.0.0.1
port 9200
flush_interval 5s
logstash_format true
logstash_prefix nginx-access
scheme http
user test
password 123456
</match>


# 访问 http://172.12.1.150:5601/app/management/kibana/dataViews
# 这样能在kibana 创建数据视图时搜到nginx 的数据集了

多行匹配

1
2
3
4
5
6
7
8
9
10
11
12
<source>
@type tail
path /path/to/java.log
pos_file /var/log/fluentd/java.log.pos
tag java.logs
<parse>
@type multiline
format_firstline /^\d{4}-\d{2}-\d{2}/
format1 /^(?<timestamp>\d{4}-\d{2}-\d{2} \d{2}:\d{2}:\d{2})\s+(?<message>.*)$/
multiline_start_regexp /^\d{4}-\d{2}-\d{2}/
</parse>
</source>

对我来说netbird比headscale好处就是可以分组自定义peer路由,完全实现服务端控制下发路由,且下发和回收路由速度几乎秒级(headscale关闭路由后很长时间不清理路由)

阅读全文 »

参考:

https://icloudnative.io/posts/custom-derp-servers/

自建私有 DERP server

使用内嵌derp

1
2
3
4
5
6
7
8
9
10
11
12
13
14
15
16
17
18
19
20
21
22
23
24
25
26
27
28
29
30
31
32
33
34
35
server_url: https://xxxxxxxx  # 必须是https
derp:
server:
# If enabled, runs the embedded DERP server and merges it into the rest of the DERP config
# The Headscale server_url defined above MUST be using https, DERP requires TLS to be in place
enabled: true

# Region ID to use for the embedded DERP server.
# The local DERP prevails if the region ID collides with other region ID coming from
# the regular DERP config.
region_id: 999

# Region code and name are displayed in the Tailscale UI to identify a DERP region
region_code: "headscale"
region_name: "Headscale Embedded DERP"

# Listens over UDP at the configured address for STUN connections - to help with NAT traversal.
# When the embedded DERP server is enabled stun_listen_addr MUST be defined.
#
# For more details on how this works, check this great article: https://tailscale.com/blog/how-tailscale-works/
stun_listen_addr: "0.0.0.0:3478"

# List of externally available DERP maps encoded in JSON
urls:
#- https://controlplane.tailscale.com/derpmap/default
# Locally available DERP map files encoded in YAML
#
# This option is mostly interesting for people hosting
# their own DERP servers:
# https://tailscale.com/kb/1118/custom-derp-servers/
#
# paths:
# - /etc/headscale/derp-example.yaml
paths:
# - /etc/headscale/derp.yaml

nginx:

1
2
3
4
5
6
7
8
9
10
11
12
13
14
15
16
17
18
19
20
21
22
23
24
25
26
27
28
map $http_upgrade $connection_upgrade {
default keep-alive;
'websocket' upgrade;
'' close;
}
server {
listen 443 ssl;
server_name xxx;
ssl_certificate certs/xxx.pem;
ssl_certificate_key certs/xxxx.key;
location /web { # web管理可使用https://github.com/gurucomputing/headscale-ui
alias /root/web;
index index.html;
}
location / {
proxy_pass http://127.0.0.1:8080;
proxy_buffering off;
proxy_http_version 1.1;
proxy_set_header Upgrade $http_upgrade;
proxy_set_header Connection $connection_upgrade;
proxy_set_header Host $server_name;
proxy_set_header X-Real-IP $remote_addr;
proxy_set_header X-Forwarded-For $proxy_add_x_forwarded_for;
proxy_set_header X-Forwarded-Proto $http_x_forwarded_proto;
add_header Strict-Transport-Security "max-age=15552000; includeSubDomains" always;
}
}

使用域名

1
2
3
4
5
6
7
docker run --restart always \
--name derper -p 12345:12345 -p 3478:3478/udp \
-v /root/certs:/app/certs \
-e DERP_CERT_MODE=manual \
-e DERP_ADDR=:12345 \
-e DERP_DOMAIN=xxxx \
-d ghcr.io/yangchuansheng/derper:latest

有几点需要注意:

  • 能用 443 端口尽量用 443 端口,实在不行再用别的端口;
  • 默认情况下也会开启 STUN 服务,UDP 端口是 3478
  • 防火墙需要放行端口 12345 和 3478;
  • 准备好 SSL 证书;
  • 域名部分我打了码,请换成你自己的域名。

假设你的域名是 xxx.com,那么证书的名称必须是 xxx.com.crt,一个字符都不能错!同理,私钥名称必须是 xxx.com.key,一个字符都不能错!

部署好 derper 之后,就可以修改 Headscale 的配置来使用自定义的 DERP 服务器了。Headscale 可以通过两种形式的配置来使用自定义 DERP:

  • 一种是在线 URL,格式是 JSON,与 Tailscale 官方控制服务器使用的格式和语法相同。
  • 另一种是本地文件,格式是 YAML

我们可以直接使用本地的 YAML 配置文件,内容如下:

1
2
3
4
5
6
7
8
9
10
11
12
13
14
15
16
17
18
19
20
21
22
23
24
25
26
27
28
29
30
31
32
33
# /etc/headscale/derp.yaml
regions:
900:
regionid: 900
regioncode: thk
regionname: Tencent Hongkong
nodes:
- name: 900a
regionid: 900
hostname: xxxx
ipv4: xxxx
stunport: 3478
stunonly: false
derpport: 12345
- name: 900b
regionid: 900
hostname: xxxx
ipv4: xxxx
stunport: 3478
stunonly: false
derpport: 12345
901:
regionid: 901
regioncode: hs
regionname: Huawei Shanghai
nodes:
- name: 901a
regionid: 901
hostname: <这里写域名>
ipv4: xxxx <如果域名可以解析就删掉这个配置>
stunport: 3478
stunonly: false
derpport: 12345

配置说明:

  • regions 是 YAML 中的对象,下面的每一个对象表示一个可用区,每个可用区里面可设置多个 DERP 节点,即 nodes
  • 每个可用区的 regionid 不能重复。
  • 每个 nodename 不能重复。
  • regionname 一般用来描述可用区,regioncode 一般设置成可用区的缩写。
  • ipv4 字段不是必须的,如果你的域名可以通过公网解析到你的 DERP 服务器地址,这里可以不填。如果你使用了一个二级域名,而这个域名你并没有在公共 DNS server 中添加相关的解析记录,那么这里就需要指定 IP(前提是你的证书包含了这个二级域名,这个很好支持,搞个泛域名证书就行了)。
  • stunonly: false 表示除了使用 STUN 服务,还可以使用 DERP 服务。
  • 上面的配置中域名和 IP 部分我都打码了,你需要根据你的实际情况填写。

接下来还需要修改 Headscale 的配置文件,引用上面的自定义 DERP 配置文件。需要修改的配置项如下:

1
2
3
4
5
6
7
8
9
10
11
12
13
14
15
16
17
18
19
20
21
22
23
24
# /etc/headscale/config.yaml
derp:
# List of externally available DERP maps encoded in JSON
urls:
# - https://controlplane.tailscale.com/derpmap/default

# Locally available DERP map files encoded in YAML
#
# This option is mostly interesting for people hosting
# their own DERP servers:
# https://tailscale.com/kb/1118/custom-derp-servers/
#
# paths:
# - /etc/headscale/derp-example.yaml
paths:
- /etc/headscale/derp.yaml

# If enabled, a worker will be set up to periodically
# refresh the given sources and update the derpmap
# will be set up.
auto_update_enabled: true

# How often should we check for DERP updates?
update_frequency: 24h

重启后访问https://xxxx:12345
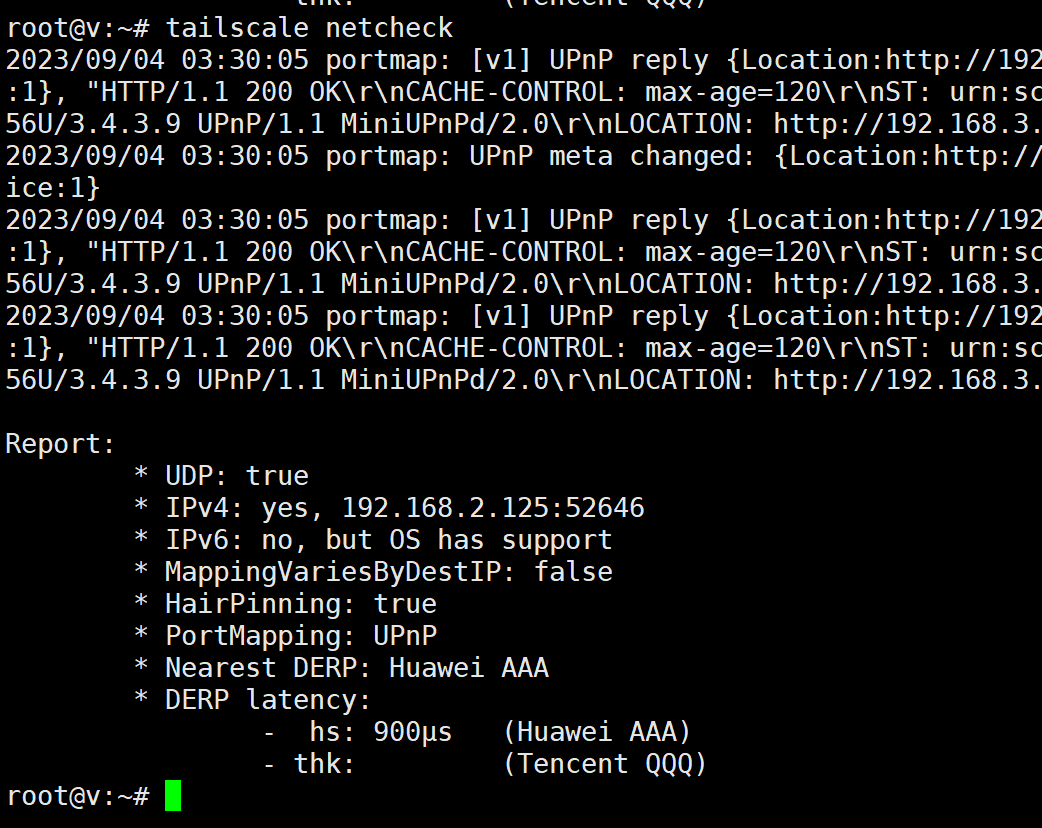
image-20230904112310981

tailscale netcheck

image-20230904113158291

image-20230904113347653

对比

1
2
3
4
5
6
7
8
9
10
11
12
13
14
15
16
17
18
19
20
21
22
23
24
25
26
27
28
29
30
31
32
33
34
35
36
37
38
39
40
41
服务器C ping 服务器A 内网docker服务
# 不使用打洞
C:\WINDOWS\system32>ping 172.19.2.2 -t

正在 Ping 172.19.2.2 具有 32 字节的数据:
来自 172.19.2.2 的回复: 字节=32 时间=9ms TTL=63
来自 172.19.2.2 的回复: 字节=32 时间=7ms TTL=63
来自 172.19.2.2 的回复: 字节=32 时间=109ms TTL=63
来自 172.19.2.2 的回复: 字节=32 时间=6ms TTL=63
来自 172.19.2.2 的回复: 字节=32 时间=7ms TTL=63
来自 172.19.2.2 的回复: 字节=32 时间=92ms TTL=63
来自 172.19.2.2 的回复: 字节=32 时间=7ms TTL=63
来自 172.19.2.2 的回复: 字节=32 时间=78ms TTL=63
来自 172.19.2.2 的回复: 字节=32 时间=7ms TTL=63
来自 172.19.2.2 的回复: 字节=32 时间=12ms TTL=63
来自 172.19.2.2 的回复: 字节=32 时间=62ms TTL=63

# 使用打洞
C:\WINDOWS\system32>ping 172.19.2.2 -t

正在 Ping 172.19.2.2 具有 32 字节的数据:
来自 172.19.2.2 的回复: 字节=32 时间=23ms TTL=63
来自 172.19.2.2 的回复: 字节=32 时间=10ms TTL=63
来自 172.19.2.2 的回复: 字节=32 时间=7ms TTL=63
来自 172.19.2.2 的回复: 字节=32 时间=9ms TTL=63
来自 172.19.2.2 的回复: 字节=32 时间=7ms TTL=63
来自 172.19.2.2 的回复: 字节=32 时间=9ms TTL=63
来自 172.19.2.2 的回复: 字节=32 时间=5ms TTL=63
来自 172.19.2.2 的回复: 字节=32 时间=6ms TTL=63

# 也可以使用 Tailscale 命令行工具来测试:
# 这个命令好像只能ping一次。。
C:\WINDOWS\system32>tailscale ping -c 0 172.19.2.2
pong from v (fd7a:115c:a1e0::2) via 192.168.2.125:41641 in 13ms --->通过ipv6点对点
pong from v (fd7a:115c:a1e0::2) via DERP(qh) in 10ms --->通过DERP

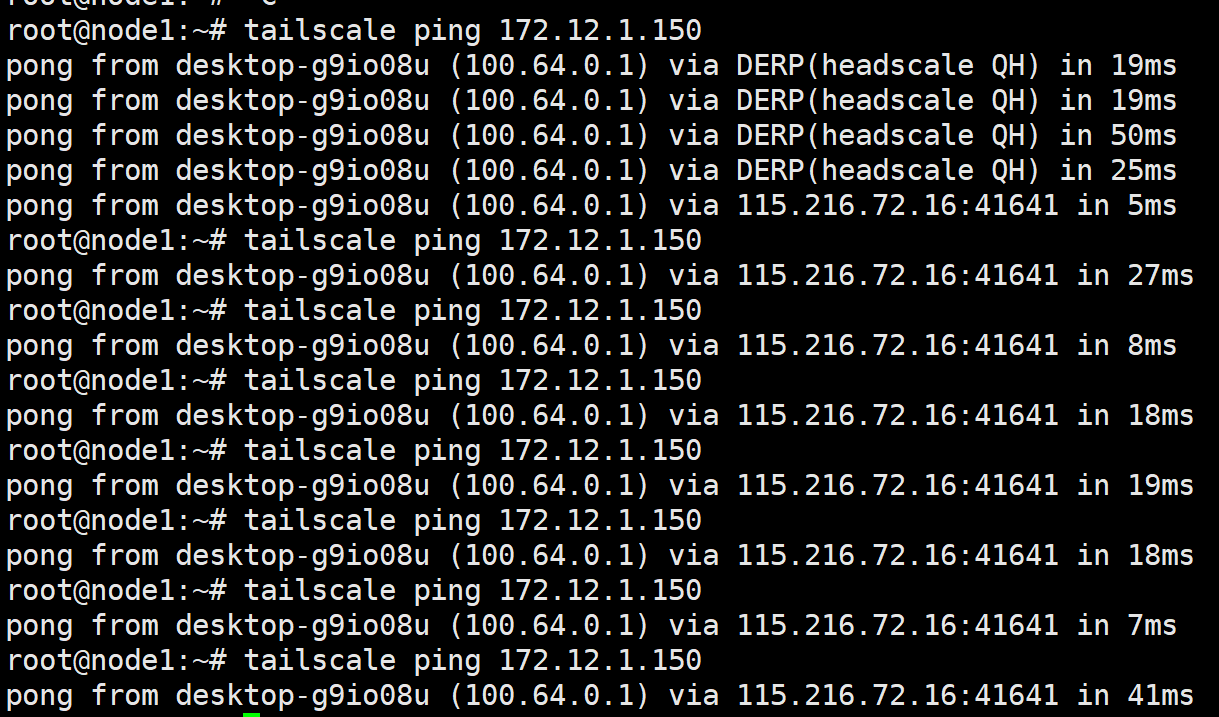
一般来说,如果算到点对点就优先走点对点,否则走了DERP延迟更高

image-20230905130501726

防止 DERP 被白嫖

先在derp节点启动tailscale

1
2
headscale preauthkeys create -e 24h -u t1
tailscale up --accept-dns=false --accept-routes=true --auth-key=xxx --login-server=http://192.168.2.124:8080

再启动derp

1
2
3
4
5
6
7
8
9
docker run --restart always \
--name derper -p 12345:12345 -p 3478:3478/udp \
-v /root/certs:/app/certs \
-e DERP_CERT_MODE=manual \
-e DERP_ADDR=:12345 \
-e DERP_DOMAIN=sit-wg.suosihulian.cn \
-e DERP_VERIFY_CLIENTS=true \
-v /var/run/tailscale/tailscaled.sock:/var/run/tailscale/tailscaled.sock \
-d ghcr.io/yangchuansheng/derper:latest

我的手机是Android10,需要将证书从用户移动到系统,但是MT管理器和RE管理器和adb,移动都会挂载失败,然后网上去搜索后,才知道,Android10对于/system目录只有读的权限。

解决方法:用magisk的模块movecert(https://github.com/Magisk-Modules-Repo/movecert),我的magisk版本为25.2,本地安装一直报unzip error,我就放弃直接用magisk安装,然后找到一个magisk的模块,可以代替magisk安装,FoxMagiskModuleManager(https://github.com/Fox2Code/FoxMagiskModuleManager)。可以在我分享的网盘链接下载链接:https://pan.baidu.com/s/1U_g536YICT3q-bcdMROzbg

提取码:xzcc。

安装方法:1.安装apk,2.将zip adb push 到手机,3.打开apk,安装zip,重启手机,4.打开加密与凭证,就可以看到证书移动到系统里了

参考:

Android12 HttpCanary系统证书安装 Magisk模块movecert

https://www.52pojie.cn/thread-1809966-1-1.html

Dockerd 代理

在执行docker pull时,是由守护进程dockerd来执行。因此,代理需要配在dockerd的环境中。而这个环境,则是受systemd所管控,因此实际是systemd的配置。

sudo mkdir -p /etc/systemd/system/docker.service.d
sudo touch /etc/systemd/system/docker.service.d/proxy.conf
在这个proxy.conf文件(可以是任意*.conf的形式)中,添加以下内容:

1
2
3
4
[Service]
Environment="HTTP_PROXY=http://127.0.0.1:8888/"
Environment="HTTPS_PROXY=http://127.0.0.1:8888/"
Environment="NO_PROXY=localhost,127.0.0.1,.example.com"
阅读全文 »
0%